Recently, I’ve been working a lot with Docker in development, and I started to research what would the best way to automate deployments with it. I found a great solution with Docker Rancher and Drone CI. So, in the next articles I will explain the whole process:
- Installing Docker Rancher with SSL.
- Adding a new Digital Ocean host.
- Adding a new service to our Digital Ocean Host.
- Adding a Drone CI service.
- Configuring Github repository with Drone CI.
- Deploy your application.
What is Docker Rancher?
Rancher is a tool that will help us to manage our containers from a graphical interface. So it makes it easy to deploy applications on the desired host. Rancher has a lot of services in its catalog that we can use to build our infrastructure. How to install it?
If you want to test Rancher to see what it can do, you can just run this command from a server running Docker:
docker run -d --name rancher-server -p 80:8080 rancher/server
Then, you can go to the server IP, and you will find the Rancher UI (it takes a little bit to start).
But, it is really painful to remember the IP of your server. So, We will create a new server and install Rancher with a domain and SSL connection. For this tutorial, I will use Digital Ocean, which has excellent features, and especially, a pre-built Docker image, where we can run Rancher.
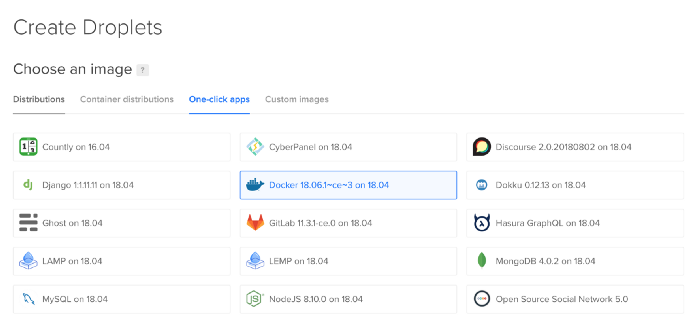
So, from the main panel of Digital Ocean, create a new Droplet, select one-click apps, and select the Docker image running on Ubuntu:

Chose a datacenter region, and don’t forget to add your SSH key:

Finally, give it a name and create the Droplet.
Now, to get Rancher up and running on the server, connect to the server through SSH, and create three files inside a rancher folder (you can name it as you want), these files are:
- docker-compose.yml
- init-letsencrypt.sh
- app.conf
docker-compose.yml
We will use this file to load all the container that we need, here is the code:
In this file, we have three services:
- nginx
- cerbot
- rancher-server
nginx takes care of managing our SSL connection and redirects to Rancher. We expose the 80 and 443 ports and create three volumes to share information with the cerbot container and to load our configuration file app.conf. We also add a network called ranchernet to communicate the containers, and we add a command, so the nginx server reloads when we update the SSL certificates.
One important line is the depends_on command, because rancher-server has to be running, so the nginx can redirect to its hostname.
cerbot container creates the SSL certificates for us. It has two volumes to share data with nginx container; we add an entrypoint which checks if your certificate is up for renewal every 12 hours as recommended by Let’s Encrypt.
rancher-server is the container that runs our Rancher. For this one, we expose the port 8080.
init-letsencrypt.sh
This script is based on this Medium article which explains how to configure Nginx with Let’s Encrypt. Let’s see the code:
This script starts nginx and rancher-server containers with some dummy certs and then run cerbot to asks for the real certificates for the domains and emails added at the top of the script.
app.conf
This is the configuration file for the nginx container, it must be placed inside ./data/nginx folder. Here is the code:
Remember to change <server_name> by the domain of your choice.
It takes some seconds to validate the SSL. But, once the SSL is approved, you can go to the domain that you chose, and you will find this view:

The next thing to do is to configure your access control, and the hosts that you will use to run your containers. We will talk about it in the following article.
See you in the next article!
